![]()
![]()
Overview || Step 1. Log On to WEBeci || Step 2. Review Your Global Preferences on the Insurer Settings Page || Step 3. Define Your Parent Roles || Step 4. Add a Group || Step 5. Designate a Group Administrator || Step 6. Add a Benefit Plan
Setting up your participating groups to use WEBeci is a five step process:
Log on to WEBeci.
Review your global preferences on the Insurer Settings page.
Define your parent roles.
Add a group.
Designate a group administrator (optional).
Add a benefit plan.
Log on to WEBeci using the URL, User ID, and password provided by ECI.
Mandatory! Review the Insurer Settings page, these are the preferences all groups and their plan members will inherit.
Access Maintenance Menu > Insurer Settings from the left-hand navigation bar.
Insurer Settings - ECI has populated your company's logo and URL for you.
Logo location: This field will be populated with the 'Eldorado' logo by default. If you wish to brand WEBeci with your company's logo, please contact ECI.
URL: The URL listed here will be the URL a user will go to when they click on the logo displayed. If you wish to add a URL to your company's website, you will first need to add your logo. Please contact ECI.
Global Application Preferences - Selections in the fields below affect the options available to participating groups and their plan members.
Users Can Update Demographics: If this box is checked, members can update their demographics information in WEBeci and that information will be automatically updated in the HEALTHpac system. An override to this global rule is located within each groups preferences settings.
Mask Member
IDs: If this box is checked only the last four digits of
a social security number will be displayed ( ).
).
Provider Search Preference: Radio button Use Network Websites Links enables users to select an external website link to look for network affiliated providers. Radio button Use HEALTHpac Database enables users to search for providers maintained in HEATLHpac.
Terminated Group/Employee Access: Enter the number of days after coverage termination that an individual or group will be able to view information in WEBeci. After the established time has elapsed, login access will be prohibited.
User Password: Security can be increased by requiring regular password changes. Additionally security elements such as capitals, numbers and/or special characters can also be required.
Notification Options - Designate the e-mail recipient for access requests submitted by providers as well as providers requesting to enroll in electronic remittance advise (ERA).
Enrollment Preferences - Hierarchy review and approval of submitted enrollment requests.
Manage Enrollment Requests: Enables ordered review of enrollment requests for approval before being written to HEALTHpac. If Sponsor Review is checked, the group administrator would receive notification of an employee submitted enrollment request. Once approved by the group administrator (Sponsor Review), a notification of a sponsor approved enrollment request would be received by the health insurer (Insurer Review). Once approved by the health insurer, the eligibility change would be written to HEALTHpac. ECI recommends that the Insurer Review box is checked if online enrollment is enabled to prevent enrollment requests from writing directly to HEATLHpac without oversight.
Create New EE/DEP Eligibility Record If: ECI recommends that all options are checked to enable eligibility changes to be written to HEALTHpac when enrollment is enabled.
Life Change Event - Reason for Change: Enables up to 12 categories of change for existing eligibility. These categories are not written to HEALTHpac, these are informational only to assist the health insurer when reviewing pending requests.
Fulfillment Vendor Preferences - Enables retrieval of an explanation of benefits for a claim submitted to a fulfillment vendor by application programming interface (API). You must have an agreement with an authorized fulfillment vendor to utilize this option in WEBeci.
Default Insured Role - The preferred access privileges that will be inherited by all groups and their plan members. An override to this global rule is located within each groups preferences settings.
Each group you add will inherit the parent roles you define. ECI has provided several master roles:
Insured Master - allows an Insured (member) to perform enrollment, view eligibility, claim and accumulator information, and update demographic information for both themselves and their dependents.
Dependent Master- allows the dependent to view their own information.
Provider Master- allows a provider to view patient eligibility, accumulation information, and claims.
Note: From your URL login page, providers can request access to WEBeci through the link Provider Access Request. Notifications will be received and approved by the recipient listed in Insurer Settings under Notification Options for Provider Requests.
Sponsor Master - allows a Sponsor (group administrator) to perform/manage enrollment, view plan members eligibility, accumulators and claims, preferences, and demographics exclusively for their members and dependents. In addition, they can define/edit/delete roles and update their own and their plan members' preferences.
Health Insurer Administrator Master - allows the health plan administrator to assume and perform all of the tasks of the sponsor. In addition, the health plan administrator can create Sponsors (groups) and manage their information, maintain benefit plans, and enrollment rules.
You may wish to define additional roles from which your groups can select.
Reminder!
To view existing roles, access Maintenance
Menu > Roles. To review what privileges are assigned to an existing
role, select the View button on
this page. Role privileges include those selected under authorization
keys as Used.
To Define a New Parent Role:
Copy a parent role that contains all standard authorization keys.
Rename the role to a name descriptive of the new role (E.g. Insured Master - No Enrollment).
De-select the authorization keys you do not wish to be available to the new role type.
Save the new role.
Note: By assuming a Sponsor first and then performing these steps a unique role can be created for use by a single group (Parent Roles vs Available Roles). This process makes the new role available only to the group it was created under.
Warning!
You need to define all available roles prior to bringing a group live in
WEBeci. Active members can access WEBeci for the first time with
their credentials (member identifier and date of birth). A role
for an 'Insured employee' will automatically be assigned. This role
is inherited from a groups preferences settings (Sponsor Settings). The
default in the groups preferences is inherited from the Default Insured
Role within Insurer Settings, which can be overwritten to meet the needs
of a specific group.
Key
Concept:
A Group in HEALTHpac is called a Sponsor in WEBeci.
ECI will automatically upload all of your existing groups in HEALTHpac when your WEBeci instance is created. Any groups added after this point to HEALTHpac will need to be manually added to WEBeci as well.
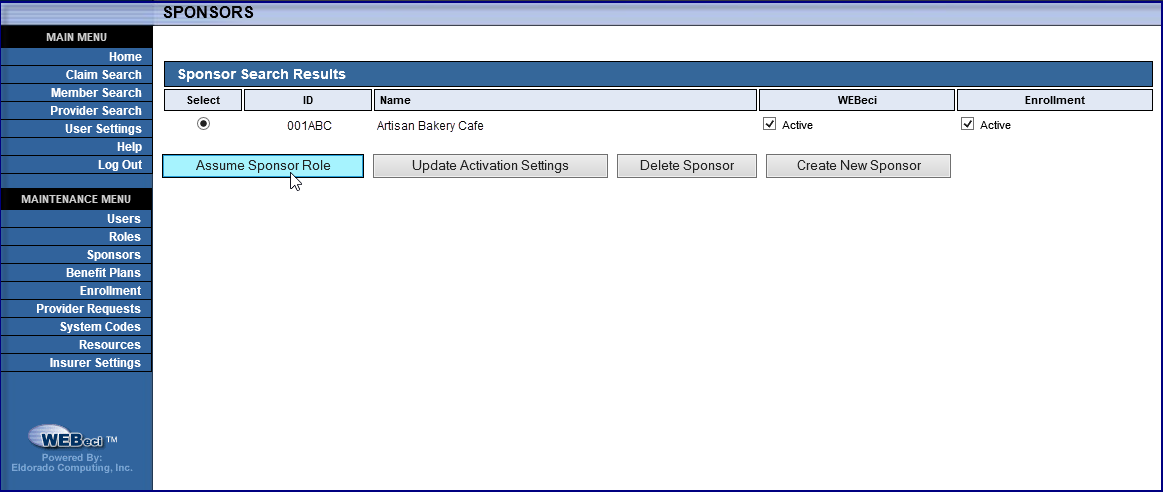
Access Maintenance Menu > Sponsor. You can perform a search by the group name, group identifier (filter by underwriter code or enter underwriter+group code), or select the Show All Sponsors button. To edit a group's information, select the radio button of the existing group and then the Assume Sponsor Role button (see Supporting WEBeci).
To create a new group, select the Create New Sponsor button.
In the ID field, enter the 6-character HEALTHpac underwriter and group number (e.g., for Underwriter 001, Group ABC you would enter 001ABC in this field).
In the Name field, enter the group name.
If you want to brand your WEBeci site with a group's logo when the group administrator and their plan members login, please contact ECI. Otherwise skip this step.
The URL listed here will be the URL a user will go to when they click on the logo. You will first need to add the logo. Please contact your ECI.
The Update HEALTHpac Demographics box will appear ONLY IF you selected it in Insurer Settings. If you do not wish a particular group to be able to update their information to HEALTHpac, de-select this box.
Review the Default Insured Role selection. By default, it will show the same selection you chose in Insurer Settings.
Reminder!
If you don't designate an administrator for a group, you will need
to assume the administrator duties (Manually assign dependent User IDs
and edit existing user privileges as necessary).
Access Maintenance Menu > Sponsor.
Select the group for which you wish to designate an administrator and then Assume Sponsor Role.
Access Maintenance Menu > Users.
Under Create a New User, select the Sponsor button.
Complete the Default Role and then Settings & Preferences: complete the User ID, Name, Password, and E-Mail field. The user will be required to complete secret questions and answers upon login that will enable them to reset their own password.
ECI will automatically upload all of your existing benefit plans in HEALTHpac when your WEBeci instance is created. Any benefit plans added after this point to HEALTHpac will need to be manually added to WEBeci as well.
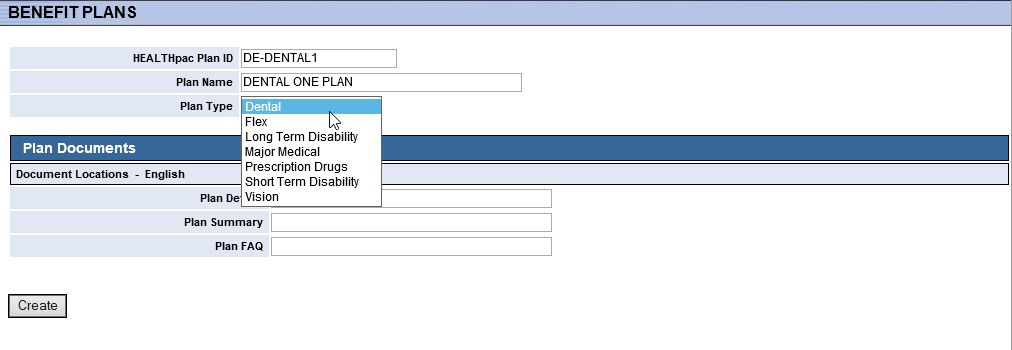
Access Maintenance Menu > Benefit Plans.
Select the Create New Plan button. Assign the policy type prefix (MM, DE, RX, VI, DI, FX) and then a dash followed by the plan code as it is listed in HEALTHpac. Complete the Plan Name and Plan Type from the drop down provided.
Submit Plan Documents to support@eldocomp.com for publication.